 ocserv 部署
# 一、概述
ocserv(OpenConnect Server) 是一个用于虚拟私人网络(VPN)连接的开源客户端软件。它最初是为了连接到 Cisco AnyConnect VPN 服务器而开发的,但现在已经发展成为一个支持多种 VPN 协议的通用客户端,包括 Windows、macOS、Linux 和 Android。
OpenConnect 的优点之一是它的灵活性。它可以通过命令行或图形用户界面进行配置,并且可以与各种 VPN 服务器兼容,包括 Cisco AnyConnect、Juniper SSL VPN 和 Palo Alto Networks GlobalProtect 等。
警告
由于强大防火墙限制,目前已经不支持部署海外服务器进行搭建。
# 二、部署
# 2.1 系统初始化
系统采用阿里云ECS服务器CentOS 7.8
- 配置yum
yum安装并非最新版本,如果想要最新版本则使用下载源码包安装,点我 (opens new window)查看地址
yum install epel-release -y
- 开启IP转发
# 配置内核参数
vim /etc/sysctl.conf
net.ipv4.ip_forward = 1
# 立即生效
sysctl -p
2
3
4
5
# 2.2 安装
官方参考文档点击访问 (opens new window)
# 直接yum安装
yum install ocserv -y
# 查看安装版本
[root@iZuf68sht1z3iphanqf9fkZ ~]# ocserv --version
ocserv 1.1.1

Compiled with: seccomp, tcp-wrappers, oath, radius, gssapi, PAM, PKCS#11, AnyConnect
GnuTLS version: 3.3.29
2
3
4
5
6
7
8
# 2.3 CA证书配置
ocserv启动必须配置证书
CA证书我们使用certtool来生成,后面我们会使用该CA证书签发ocserv所需证书来启动,首先我们需要安装该工具包:
yum install gnutls-utils -y
# 2.3.1创建CA模板
[root@iZuf68sht1z3iphanqf9fkZ ~]# mkdir /opt/ssl
[root@iZuf68sht1z3iphanqf9fkZ ~]# vim /opt/ssl/ca.tmpl
cn = "losinx"
organization = "losinx"
serial = 1
expiration_days = 3650
ca
signing_key
cert_signing_key
crl_signing_key
2
3
4
5
6
7
8
9
10
模板参数说明
- cn:通用名称,用于指定证书的主题(Subject)。它通常是证书的主要标识,可以是域名、服务器名称等。
- organization: 组织名称,用于指定证书所属的组织。
- serial: 序列号,用于标识证书的唯一性。每个证书必须具有唯一的序列号。
- expiration_days: 证书的有效期天数,指定证书从颁发之日起的有效期限。
- ca: 表示该证书是一个根证书(Certificate Authority),即证书颁发机构的证书。
- signing_key: 表示该证书可用于签名其他证书。
- cert_signing_key: 表示该证书可用于签名用户证书。
- crl_signing_key: 表示该证书可用于签名 CRL(证书撤销列表)。
# 2.3.2生成CA私钥
私钥文件是 CA 在数字证书颁发和管理过程中的关键部分,用于加密和签署证书。
certtool --generate-privkey --outfile /opt/ssl/ca-key.pem
# 2.3.3 生成CA证书
创建ca证书时,指定私钥及模板
certtool --generate-self-signed --load-privkey /opt/ssl/ca-key.pem --template /opt/ssl/ca.tmpl --outfile /opt/ssl/ca-cert.pem
# 2.4 ocserv服务证书生成
这次我们基于上面的CA证书签发
# 2.4.1 创建证书模板文件
[root@iZuf68sht1z3iphanqf9fkZ ~]# vim /opt/ssl/ocserv.tmpl
cn = "losinx"
organization = "losinx"
serial = 2
expiration_days = 3650
tls_www_client
signing_key
2
3
4
5
6
7
证书参数解释
- cn: 证书的通用名称,即证书的主题。可以根据需要将其修改为实际的名称。
- organization: 证书所属的组织名称。可以根据实际情况进行修改。
- serial: 证书的序列号。每个证书必须具有唯一的序列号。请将其更改为适当的值。
- expiration_days: 证书的有效期天数。可以根据需求进行更改。
- tls_www_client: 表示该证书用于 TLS/SSL 客户端身份验证。
- signing_key: 表示该证书使用之前生成的 CA 私钥进行签名。
# 2.4.2 生成和签名证书
# 私钥
certtool --generate-privkey --outfile /opt/ssl/ocserv-key.pem

# 证书
certtool --generate-certificate --load-privkey /opt/ssl/ocserv-key.pem --load-ca-certificate /opt/ssl/ca-cert.pem --load-ca-privkey /opt/ssl/ca-key.pem --template /opt/ssl/ocserv.tmpl --outfile /opt/ssl/ocserv-cert.pem
2
3
4
5
参数说明
ca-key.pem: 之前生成的 CA 私钥文件。ca-crt.pem:是之前生成的 CA 证书文件。ocserv.tmpl:是我们创建的ocser证书模板文件。ocserv-cert.pem:是生成的证书文件的输出路径和文件名。
# 2.5 配置ocserv
yum安装之后,默认配置文件在
/etc/ocserv下的ocserv.conf文件
- 配置认证模式
# 配置认证模式
# ## 同时还支持本地用户帐户、LDAP、RADIUS 等,以实现灵活的认证方式
auth = "plain[passwd=/etc/ocserv/ocpasswd]"
2
3
- 端口
默认为443端口
tcp-port = 9143
udp-port = 9143
2
- 证书
使用2.4生成的证书
# 配置上面的证书文件和私钥
server-cert = /etc/ocserv/ocserv-cert.pem
server-key = /etc/ocserv/ocserv-key.pem

# 这里我们也可以直接使用ca证书,这样上面生成ocserv证书就可以省略
server-cert = /etc/ocserv/ca-cert.pem
server-key = /etc/ocserv/ca-key.pem
2
3
4
5
6
7
- 配置vpn网段
这里尽量使用一个独立的网段,不要跟服务器及本地网段有冲突
ipv4-network = 10.100.1.0
ipv4-netmask = 255.255.255.0
2
完整配置
### The following directives do not change with server reload.
#
# User authentication method. To require multiple methods to be
# used for the user to login, add multiple auth directives. The values
# in the 'auth' directive are AND composed (if multiple all must
# succeed).
# Available options: certificate, plain, pam, radius, gssapi.
# Note that authentication methods utilizing passwords cannot be
# combined (e.g., the plain, pam or radius methods).
#
# certificate:
#  This indicates that all connecting users must present a certificate.
#  The username and user group will be then extracted from it (see
#  cert-user-oid and cert-group-oid). The certificate to be accepted
#  it must be signed by the CA certificate as specified in 'ca-cert' and
#  it must not be listed in the CRL, as specified by the 'crl' option.
#
# pam[gid-min=1000]:
#  This enabled PAM authentication of the user. The gid-min option is used
# by auto-select-group option, in order to select the minimum valid group ID.
#
# plain[passwd=/etc/ocserv/ocpasswd,otp=/etc/ocserv/users.otp]
#  The plain option requires specifying a password file which contains
# entries of the following format.
# "username:groupname1,groupname2:encoded-password"
# One entry must be listed per line, and 'ocpasswd' should be used
# to generate password entries. The 'otp' suboption allows to specify
# an oath password file to be used for one time passwords; the format of
# the file is described in https://code.google.com/p/mod-authn-otp/wiki/UsersFile
#
# radius[config=/etc/radiusclient/radiusclient.conf,groupconfig=true,nas-identifier=name,override-interim-updates=false]:
#  The radius option requires specifying freeradius-client configuration
# file. If the groupconfig option is set, then config-per-user will be overriden,
# and all configuration will be read from radius. The 'override-interim-updates' if set to
# true will ignore Acct-Interim-Interval from the server and 'stats-report-time' will be considered.
#
# gssapi[keytab=/etc/key.tab,require-local-user-map=true,tgt-freshness-time=900]
#  The gssapi option allows to use authentication methods supported by GSSAPI,
# such as Kerberos tickets with ocserv. It should be best used as an alternative
# to PAM (i.e., have pam in auth and gssapi in enable-auth), to allow users with
# tickets and without tickets to login. The default value for require-local-user-map
# is true. The 'tgt-freshness-time' if set, it would require the TGT tickets presented
# to have been issued within the provided number of seconds. That option is used to
# restrict logins even if the KDC provides long time TGT tickets.

# auth = "pam"
#auth = "pam[gid-min=1000]"
#auth = "plain[passwd=./sample.passwd,otp=./sample.otp]"
#auth = "certificate"
#auth = "radius[config=/etc/radiusclient/radiusclient.conf,groupconfig=true]"
auth = "plain[passwd=/etc/ocserv/ocpasswd]"
# Specify alternative authentication methods that are sufficient
# for authentication. That is, if set, any of the methods enabled
# will be sufficient to login, irrespective of the main 'auth' entries.
# When multiple options are present, they are OR composed (any of them
# succeeding allows login).
#enable-auth = "certificate"
#enable-auth = "gssapi"
#enable-auth = "gssapi[keytab=/etc/key.tab,require-local-user-map=true,tgt-freshness-time=900]"

# Accounting methods available:
# radius: can be combined with any authentication method, it provides
#      radius accounting to available users (see also stats-report-time).
#
# pam: can be combined with any authentication method, it provides
#      a validation of the connecting user's name using PAM. It is
#      superfluous to use this method when authentication is already
#      PAM.
#
# Only one accounting method can be specified.
#acct = "radius[config=/etc/radiusclient/radiusclient.conf]"

# Use listen-host to limit to specific IPs or to the IPs of a provided
# hostname.
#listen-host = [IP|HOSTNAME]

# When the server has a dynamic DNS address (that may change),
# should set that to true to ask the client to resolve again on
# reconnects.
#listen-host-is-dyndns = true

# TCP and UDP port number
tcp-port = 9143
udp-port = 9143

# Accept connections using a socket file. It accepts HTTP
# connections (i.e., without SSL/TLS unlike its TCP counterpart),
# and uses it as the primary channel. That option cannot be
# combined with certificate authentication.
#listen-clear-file = /var/run/ocserv-conn.socket

# The user the worker processes will be run as. It should be
# unique (no other services run as this user).
run-as-user = ocserv
run-as-group = ocserv

# socket file used for IPC with occtl. You only need to set that,
# if you use more than a single servers.
#occtl-socket-file = /var/run/occtl.socket

# socket file used for server IPC (worker-main), will be appended with .PID
# It must be accessible within the chroot environment (if any), so it is best
# specified relatively to the chroot directory.
socket-file = ocserv.sock

# The default server directory. Does not require any devices present.
chroot-dir = /var/lib/ocserv


### All configuration options below this line are reloaded on a SIGHUP.
### The options above, will remain unchanged. Note however, that the
### server-cert, server-key, dh-params and ca-cert options will be reloaded
### if the provided file changes, on server reload. That allows certificate
### rotation, but requires the server key to remain the same for seamless
### operation. If the server key changes on reload, there may be connection
### failures during the reloading time.


# Whether to enable seccomp/Linux namespaces worker isolation. That restricts the number of
# system calls allowed to a worker process, in order to reduce damage from a
# bug in the worker process. It is available on Linux systems at a performance cost.
# The performance cost is roughly 2% overhead at transfer time (tested on a Linux 3.17.8).
# Note however, that process isolation is restricted to the specific libc versions
# the isolation was tested at. If you get random failures on worker processes, try
# disabling that option and report the failures you, along with system and debugging
# information at: https://gitlab.com/ocserv/ocserv/issues
isolate-workers = true

# A banner to be displayed on clients after connection
#banner = "Welcome"

# A banner to be displayed on clients before connection
#pre-login-banner = "Welcome"

# Limit the number of clients. Unset or set to zero for unlimited.
#max-clients = 1024
max-clients = 16

# Limit the number of identical clients (i.e., users connecting
# multiple times). Unset or set to zero for unlimited.
max-same-clients = 2

# When the server receives connections from a proxy, like haproxy
# which supports the proxy protocol, set this to obtain the correct
# client addresses. The proxy protocol would then be expected in
# the TCP or UNIX socket (not the UDP one). Although both v1
# and v2 versions of proxy protocol are supported, the v2 version
# is recommended as it is more efficient in parsing.
#listen-proxy-proto = true

# Rate limit the number of incoming connections to one every X milliseconds
# (X is the provided value), as the secmod backlog grows. This
# makes the server more resilient (and prevents connection failures) on
# multiple concurrent connections. Set to zero for no limit.
rate-limit-ms = 100

# Stats report time. The number of seconds after which each
# worker process will report its usage statistics (number of
# bytes transferred etc). This is useful when accounting like
# radius is in use.
#stats-report-time = 360

# Keepalive in seconds
keepalive = 32400

# Dead peer detection in seconds.
# Note that when the client is behind a NAT this value
# needs to be short enough to prevent the NAT disassociating
# his UDP session from the port number. Otherwise the client
# could have his UDP connection stalled, for several minutes.
dpd = 90

# Dead peer detection for mobile clients. That needs to
# be higher to prevent such clients being awaken too
# often by the DPD messages, and save battery.
# The mobile clients are distinguished from the header
# 'X-AnyConnect-Identifier-DeviceType'.
mobile-dpd = 1800

# If using DTLS, and no UDP traffic is received for this
# many seconds, attempt to send future traffic over the TCP
# connection instead, in an attempt to wake up the client
# in the case that there is a NAT and the UDP translation
# was deleted. If this is unset, do not attempt to use this
# recovery mechanism.
switch-to-tcp-timeout = 25

# MTU discovery (DPD must be enabled)
try-mtu-discovery = false

# The key and the certificates of the server
# The key may be a file, or any URL supported by GnuTLS (e.g.,
# tpmkey:uuid=xxxxxxx-xxxx-xxxx-xxxx-xxxxxxxx;storage=user
# or pkcs11:object=my-vpn-key;object-type=private)
#
# The server-cert file may contain a single certificate, or
# a sorted certificate chain.
#
# There may be multiple server-cert and server-key directives,
# but each key should correspond to the preceding certificate.
# The certificate files will be reloaded when changed allowing for in-place
# certificate renewal (they are checked and reloaded periodically;
# a SIGHUP signal to main server will force reload).

server-cert = /etc/ocserv/ocserv-cert.pem
server-key = /etc/ocserv/ocserv-key.pem
# Diffie-Hellman parameters. Only needed if you require support
# for the DHE ciphersuites (by default this server supports ECDHE).
# Can be generated using:
# certtool --generate-dh-params --outfile /path/to/dh.pem
#dh-params = /path/to/dh.pem

# If you have a certificate from a CA that provides an OCSP
# service you may provide a fresh OCSP status response within
# the TLS handshake. That will prevent the client from connecting
# independently on the OCSP server.
# You can update this response periodically using:
# ocsptool --ask --load-cert=your_cert --load-issuer=your_ca --outfile response
# Make sure that you replace the following file in an atomic way.
#ocsp-response = /path/to/ocsp.der

# In case PKCS #11, TPM or encrypted keys are used the PINs should be available
# in files. The srk-pin-file is applicable to TPM keys only, and is the
# storage root key.
#pin-file = /path/to/pin.txt
#srk-pin-file = /path/to/srkpin.txt

# The password or PIN needed to unlock the key in server-key file.
# Only needed if the file is encrypted or a PKCS #11 object. This
# is an alternative method to pin-file.
#key-pin = 1234

# The SRK PIN for TPM.
# This is an alternative method to srk-pin-file.
#srk-pin = 1234

# The Certificate Authority that will be used to verify
# client certificates (public keys) if certificate authentication
# is set.
ca-cert = /etc/pki/ocserv/cacerts/ca.crt

# The object identifier that will be used to read the user ID in the client
# certificate. The object identifier should be part of the certificate's DN
# Useful OIDs are:
#  CN = 2.5.4.3, UID = 0.9.2342.19200300.100.1.1
cert-user-oid = 0.9.2342.19200300.100.1.1

# The object identifier that will be used to read the user group in the
# client  certificate. The object identifier should be part of the certificate's
# DN. Useful OIDs are:
#  OU (organizational unit) = 2.5.4.11
#cert-group-oid = 2.5.4.11

# The revocation list of the certificates issued by the 'ca-cert' above.
# See the manual to generate an empty CRL initially. The CRL will be reloaded
# periodically when ocserv detects a change in the file. To force a reload use
# SIGHUP.
#crl = /path/to/crl.pem

# Uncomment this to enable compression negotiation (LZS, LZ4).
#compression = true

# Set the minimum size under which a packet will not be compressed.
# That is to allow low-latency for VoIP packets. The default size
# is 256 bytes. Modify it if the clients typically use compression
# as well of VoIP with codecs that exceed the default value.
#no-compress-limit = 256

# GnuTLS priority string; note that SSL 3.0 is disabled by default
# as there are no openconnect (and possibly anyconnect clients) using
# that protocol. The string below does not enforce perfect forward
# secrecy, in order to be compatible with legacy clients.
#
# Note that the most performant ciphersuites are the moment are the ones
# involving AES-GCM. These are very fast in x86 and x86-64 hardware, and
# in addition require no padding, thus taking full advantage of the MTU.
# For that to be taken advantage of, the openconnect client must be
# used, and the server must be compiled against GnuTLS 3.2.7 or later.
# Use "gnutls-cli --benchmark-tls-ciphers", to see the performance
# difference with AES_128_CBC_SHA1 (the default for anyconnect clients)
# in your system.

tls-priorities = "NORMAL:%SERVER_PRECEDENCE:%COMPAT:-VERS-SSL3.0"

# More combinations in priority strings are available, check
# http://gnutls.org/manual/html_node/Priority-Strings.html
# E.g., the string below enforces perfect forward secrecy (PFS)
# on the main channel.
#tls-priorities = "NORMAL:%SERVER_PRECEDENCE:%COMPAT:-RSA:-VERS-SSL3.0:-ARCFOUR-128"

# That option requires the established DTLS channel to use the same
# cipher as the primary TLS channel. This cannot be combined with
# listen-clear-file since the ciphersuite information is not available
# in that configuration. Note also, that this option implies that
# dtls-legacy option is false; this option cannot be enforced
# in the legacy/compat protocol.
#match-tls-dtls-ciphers = true

# The time (in seconds) that a client is allowed to stay connected prior
# to authentication
auth-timeout = 240

# The time (in seconds) that a client is allowed to stay idle (no traffic)
# before being disconnected. Unset to disable.
#idle-timeout = 1200

# The time (in seconds) that a client is allowed to stay connected
# Unset to disable.
#session-timeout = 86400

# The time (in seconds) that a mobile client is allowed to stay idle (no
# traffic) before being disconnected. Unset to disable.
#mobile-idle-timeout = 2400

# The time (in seconds) that a client is not allowed to reconnect after
# a failed authentication attempt.
min-reauth-time = 300

# Banning clients in ocserv works with a point system. IP addresses
# that get a score over that configured number are banned for
# min-reauth-time seconds. By default a wrong password attempt is 10 points,
# a KKDCP POST is 1 point, and a connection is 1 point. Note that
# due to difference processes being involved the count of points
# will not be real-time precise.
#
# Score banning cannot be reliably used when receiving proxied connections
# locally from an HTTP server (i.e., when listen-clear-file is used).
#
# Set to zero to disable.
max-ban-score = 50

# The time (in seconds) that all score kept for a client is reset.
ban-reset-time = 300

# In case you'd like to change the default points.
#ban-points-wrong-password = 10
#ban-points-connection = 1
#ban-points-kkdcp = 1

# Cookie timeout (in seconds)
# Once a client is authenticated he's provided a cookie with
# which he can reconnect. That cookie will be invalided if not
# used within this timeout value. On a user disconnection, that
# cookie will also be active for this time amount prior to be
# invalid. That should allow a reasonable amount of time for roaming
# between different networks.
cookie-timeout = 300

# If this is enabled (not recommended) the cookies will stay
# valid even after a user manually disconnects, and until they
# expire. This may improve roaming with some broken clients.
#persistent-cookies = true

# Whether roaming is allowed, i.e., if true a cookie is
# restricted to a single IP address and cannot be re-used
# from a different IP.
deny-roaming = false

# ReKey time (in seconds)
# ocserv will ask the client to refresh keys periodically once
# this amount of seconds is elapsed. Set to zero to disable (note
# that, some clients fail if rekey is disabled).
rekey-time = 172800

# ReKey method
# Valid options: ssl, new-tunnel
#  ssl: Will perform an efficient rehandshake on the channel allowing
#       a seamless connection during rekey.
#  new-tunnel: Will instruct the client to discard and re-establish the channel.
#       Use this option only if the connecting clients have issues with the ssl
#       option.
rekey-method = ssl

# Script to call when a client connects and obtains an IP.
# The following parameters are passed on the environment.
# REASON, USERNAME, GROUPNAME, HOSTNAME (the hostname selected by client),
# DEVICE, IP_REAL (the real IP of the client), IP_REAL_LOCAL (the local
# interface IP the client connected), IP_LOCAL (the local IP
# in the P-t-P connection), IP_REMOTE (the VPN IP of the client),
# IPV6_LOCAL (the IPv6 local address if there are both IPv4 and IPv6
# assigned), IPV6_REMOTE (the IPv6 remote address), IPV6_PREFIX, and
# ID (a unique numeric ID); REASON may be "connect" or "disconnect".
# In addition the following variables OCSERV_ROUTES (the applied routes for this
# client), OCSERV_NO_ROUTES, OCSERV_DNS (the DNS servers for this client),
# will contain a space separated list of routes or DNS servers. A version
# of these variables with the 4 or 6 suffix will contain only the IPv4 or
# IPv6 values.

# The disconnect script will receive the additional values: STATS_BYTES_IN,
# STATS_BYTES_OUT, STATS_DURATION that contain a 64-bit counter of the bytes
# output from the tun device, and the duration of the session in seconds.

#connect-script = /usr/bin/ocserv-script
#disconnect-script = /usr/bin/ocserv-script

# UTMP
# Register the connected clients to utmp. This will allow viewing
# the connected clients using the command 'who'.
#use-utmp = true

# Whether to enable support for the occtl tool (i.e., either through D-BUS,
# or via a unix socket).
use-occtl = true

# PID file. It can be overriden in the command line.
pid-file = /var/run/ocserv.pid

# Set the protocol-defined priority (SO_PRIORITY) for packets to
# be sent. That is a number from 0 to 6 with 0 being the lowest
# priority. Alternatively this can be used to set the IP Type-
# Of-Service, by setting it to a hexadecimal number (e.g., 0x20).
# This can be set per user/group or globally.
#net-priority = 3

# Set the VPN worker process into a specific cgroup. This is Linux
# specific and can be set per user/group or globally.
#cgroup = "cpuset,cpu:test"

#
# Network settings
#

# The name to use for the tun device
device = vpns

# Whether the generated IPs will be predictable, i.e., IP stays the
# same for the same user when possible.
predictable-ips = true

# The default domain to be advertised
default-domain = example.com

# The pool of addresses that leases will be given from. If the leases
# are given via Radius, or via the explicit-ip? per-user config option then
# these network values should contain a network with at least a single
# address that will remain under the full control of ocserv (that is
# to be able to assign the local part of the tun device address).
#ipv4-network = 192.168.1.0
#ipv4-netmask = 255.255.255.0
#
ipv4-network = 10.100.1.0
ipv4-netmask = 255.255.255.0

# An alternative way of specifying the network:
#ipv4-network = 192.168.1.0/24

# The IPv6 subnet that leases will be given from.
#ipv6-network = fda9:4efe:7e3b:03ea::/64

# Specify the size of the network to provide to clients. It is
# generally recommended to provide clients with a /64 network in
# IPv6, but any subnet may be specified. To provide clients only
# with a single IP use the prefix 128.
#ipv6-subnet-prefix = 128
#ipv6-subnet-prefix = 64

# Whether to tunnel all DNS queries via the VPN. This is the default
# when a default route is set.
#tunnel-all-dns = true

# The advertized DNS server. Use multiple lines for
# multiple servers.
# dns = fc00::4be0
#dns = 192.168.1.2

# The NBNS server (if any)
#nbns = 192.168.1.3

# The domains over which the provided DNS should be used. Use
# multiple lines for multiple domains.
#split-dns = example.com

# Prior to leasing any IP from the pool ping it to verify that
# it is not in use by another (unrelated to this server) host.
# Only set to true, if there can be occupied addresses in the
# IP range for leases.
ping-leases = false

# Use this option to enforce an MTU value to the incoming
# connections. Unset to use the default MTU of the TUN device.
#mtu = 1420

# Unset to enable bandwidth restrictions (in bytes/sec). The
# setting here is global, but can also be set per user or per group.
#rx-data-per-sec = 40000
#tx-data-per-sec = 40000

# The number of packets (of MTU size) that are available in
# the output buffer. The default is low to improve latency.
# Setting it higher will improve throughput.
#output-buffer = 10

# Routes to be forwarded to the client. If you need the
# client to forward routes to the server, you may use the
# config-per-user/group or even connect and disconnect scripts.
#
# To set the server as the default gateway for the client just
# comment out all routes from the server, or use the special keyword
# 'default'.

#route = 10.10.10.0/255.255.255.0
#route = 192.168.0.0/255.255.0.0
#route = fef4:db8:1000:1001::/64

# Subsets of the routes above that will not be routed by
# the server.

#no-route = 192.168.5.0/255.255.255.0

# If set, the script /usr/bin/ocserv-fw will be called to restrict
# the user to its allowed routes and prevent him from accessing
# any other routes. In case of defaultroute, the no-routes are restricted.
# All the routes applied by ocserv can be reverted using /usr/bin/ocserv-fw
# --removeall. This option can be set globally or in the per-user configuration.
#restrict-user-to-routes = true

# When set to true, all client's iroutes are made visible to all
# connecting clients except for the ones offering them. This option
# only makes sense if config-per-user is set.
#expose-iroutes = true

# Groups that a client is allowed to select from.
# A client may belong in multiple groups, and in certain use-cases
# it is needed to switch between them. For these cases the client can
# select prior to authentication. Add multiple entries for multiple groups.
# The group may be followed by a user-friendly name in brackets.
#select-group = group1
#select-group = group2[My special group]

# The name of the (virtual) group that if selected it would assign the user
# to its default group.
#default-select-group = DEFAULT

# Instead of specifying manually all the allowed groups, you may instruct
# ocserv to scan all available groups and include the full list.
#auto-select-group = true

# Configuration files that will be applied per user connection or
# per group. Each file name on these directories must match the username
# or the groupname.
# The options allowed in the configuration files are dns, nbns,
#  ipv?-network, ipv4-netmask, rx/tx-per-sec, iroute, route, no-route,
#  explicit-ipv4, explicit-ipv6, net-priority, deny-roaming, no-udp,
#  user-profile, cgroup, stats-report-time, and session-timeout.
#
# Note that the 'iroute' option allows to add routes on the server
# based on a user or group. The syntax depends on the input accepted
# by the commands route-add-cmd and route-del-cmd (see below). The no-udp
# is a boolean option (e.g., no-udp = true), and will prevent a UDP session
# for that specific user or group.

#config-per-user = /etc/ocserv/config-per-user/
#config-per-group = /etc/ocserv/config-per-group/

# When config-per-xxx is specified and there is no group or user that
# matches, then utilize the following configuration.
#default-user-config = /etc/ocserv/defaults/user.conf
#default-group-config = /etc/ocserv/defaults/group.conf

# The system command to use to setup a route. %{R} will be replaced with the
# route/mask and %{D} with the (tun) device.
#
# The following example is from linux systems. %R should be something
# like 192.168.2.0/24 (the argument of iroute).

#route-add-cmd = "ip route add %{R} dev %{D}"
#route-del-cmd = "ip route delete %{R} dev %{D}"

# This option allows to forward a proxy. The special keywords '%{U}'
# and '%{G}', if present will be replaced by the username and group name.
#proxy-url = http://example.com/
#proxy-url = http://example.com/%{U}/

# This option allows you to specify a URL location where a client can
# post using MS-KKDCP, and the message will be forwarded to the provided
# KDC server. That is a translation URL between HTTP and Kerberos.
# In MIT kerberos you'll need to add in realms:
#   EXAMPLE.COM = {
#     kdc = https://ocserv.example.com/kerberos
#     http_anchors = FILE:/etc/ocserv-ca.pem
#   }
# This option is available if ocserv is compiled with GSSAPI support.

#kkdcp = SERVER-PATH KERBEROS-REALM PROTOCOL@SERVER:PORT
#kkdcp = /kerberos EXAMPLE.COM udp@127.0.0.1:88
#kkdcp = /kerberos-tcp EXAMPLE.COM tcp@127.0.0.1:88

#
# The following options are for (experimental) AnyConnect client
# compatibility.

# This option will enable the pre-draft-DTLS version of DTLS, and
# will not require clients to present their certificate on every TLS
# connection. It must be set to true to support legacy CISCO clients
# and openconnect clients < 7.08. When set to true, it implies dtls-legacy = true.
cisco-client-compat = true

# This option allows to disable the DTLS-PSK negotiation (enabled by default).
# The DTLS-PSK negotiation was introduced in ocserv 0.11.5 to deprecate
# the pre-draft-DTLS negotiation inherited from AnyConnect. It allows the
# DTLS channel to negotiate its ciphers and the DTLS protocol version.
#dtls-psk = false

# This option allows to disable the legacy DTLS negotiation (enabled by default,
# but that may change in the future).
# The legacy DTLS uses a pre-draft version of the DTLS protocol and was
# from AnyConnect protocol. It has several limitations, that are addressed
# by the dtls-psk protocol supported by openconnect 7.08+.
dtls-legacy = true

# Client profile xml. A sample file exists in doc/profile.xml.
# It is required by some of the CISCO clients.
# This file must be accessible from inside the worker's chroot.
user-profile = profile.xml

#Advanced options

# Option to allow sending arbitrary custom headers to the client after
# authentication and prior to VPN tunnel establishment. You shouldn't
# need to use this option normally; if you do and you think that
# this may help others, please send your settings and reason to
# the openconnect mailing list. The special keywords '%{U}'
# and '%{G}', if present will be replaced by the username and group name.
#custom-header = "X-My-Header: hi there"
2
3
4
5
6
7
8
9
10
11
12
13
14
15
16
17
18
19
20
21
22
23
24
25
26
27
28
29
30
31
32
33
34
35
36
37
38
39
40
41
42
43
44
45
46
47
48
49
50
51
52
53
54
55
56
57
58
59
60
61
62
63
64
65
66
67
68
69
70
71
72
73
74
75
76
77
78
79
80
81
82
83
84
85
86
87
88
89
90
91
92
93
94
95
96
97
98
99
100
101
102
103
104
105
106
107
108
109
110
111
112
113
114
115
116
117
118
119
120
121
122
123
124
125
126
127
128
129
130
131
132
133
134
135
136
137
138
139
140
141
142
143
144
145
146
147
148
149
150
151
152
153
154
155
156
157
158
159
160
161
162
163
164
165
166
167
168
169
170
171
172
173
174
175
176
177
178
179
180
181
182
183
184
185
186
187
188
189
190
191
192
193
194
195
196
197
198
199
200
201
202
203
204
205
206
207
208
209
210
211
212
213
214
215
216
217
218
219
220
221
222
223
224
225
226
227
228
229
230
231
232
233
234
235
236
237
238
239
240
241
242
243
244
245
246
247
248
249
250
251
252
253
254
255
256
257
258
259
260
261
262
263
264
265
266
267
268
269
270
271
272
273
274
275
276
277
278
279
280
281
282
283
284
285
286
287
288
289
290
291
292
293
294
295
296
297
298
299
300
301
302
303
304
305
306
307
308
309
310
311
312
313
314
315
316
317
318
319
320
321
322
323
324
325
326
327
328
329
330
331
332
333
334
335
336
337
338
339
340
341
342
343
344
345
346
347
348
349
350
351
352
353
354
355
356
357
358
359
360
361
362
363
364
365
366
367
368
369
370
371
372
373
374
375
376
377
378
379
380
381
382
383
384
385
386
387
388
389
390
391
392
393
394
395
396
397
398
399
400
401
402
403
404
405
406
407
408
409
410
411
412
413
414
415
416
417
418
419
420
421
422
423
424
425
426
427
428
429
430
431
432
433
434
435
436
437
438
439
440
441
442
443
444
445
446
447
448
449
450
451
452
453
454
455
456
457
458
459
460
461
462
463
464
465
466
467
468
469
470
471
472
473
474
475
476
477
478
479
480
481
482
483
484
485
486
487
488
489
490
491
492
493
494
495
496
497
498
499
500
501
502
503
504
505
506
507
508
509
510
511
512
513
514
515
516
517
518
519
520
521
522
523
524
525
526
527
528
529
530
531
532
533
534
535
536
537
538
539
540
541
542
543
544
545
546
547
548
549
550
551
552
553
554
555
556
557
558
559
560
561
562
563
564
565
566
567
568
569
570
571
572
573
574
575
576
577
578
579
580
581
582
583
584
585
586
587
588
589
590
591
592
593
594
595
596
597
598
599
600
601
602
603
604
605
606
607
608
609
610
611
612
613
614
615
616
617
618
619
620
621
622
623
624
625
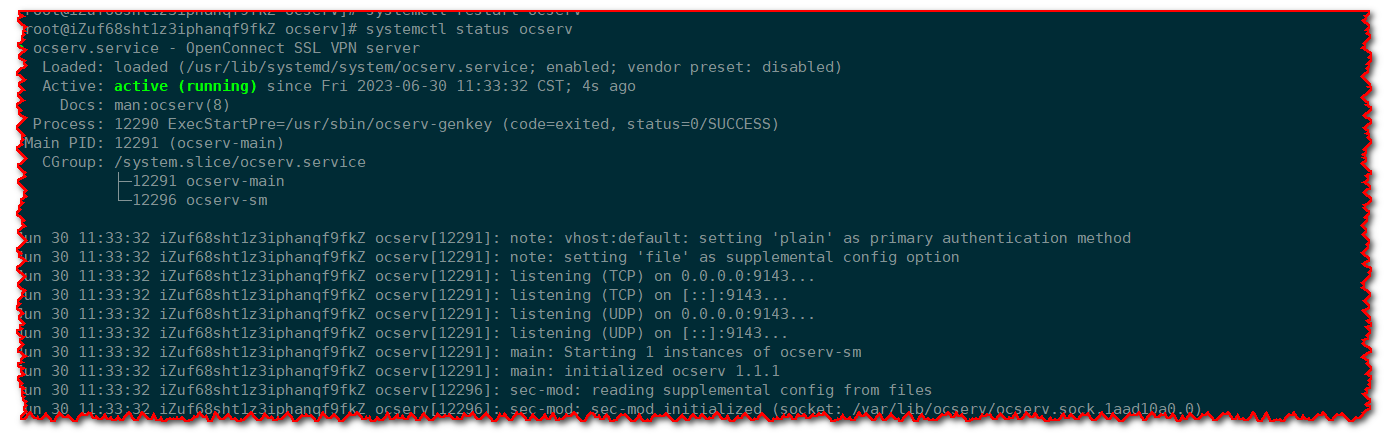
# 2.6 启动
# 首次安装 先添加至开机自启动
systemctl enable ocserv
# 启动
systemctl restart ocserv
# 查看端口监听
netstat -nlpt|grep 9143
2
3
4
5
6
# 三、客户端
上面部署好之后,如果想要登陆,我们需要下载客户端进程配置登录,各种客户端下载地址 (opens new window)
安装这里就不再说明,都是图形化直接点击下一步下一步完成安装即可。
# 四、账号管理
在上面我们配置ocserv时,使用 plain 认证方式,并且密码文件位于 /etc/ocserv/ocpasswd,更多命令管理点击查看 (opens new window)
# 4.1 创建用户
[root@iZuf68sht1z3iphanqf9fkZ ~]# touch /etc/ocserv/ocpasswd
[root@iZuf68sht1z3iphanqf9fkZ ~]# ocpasswd tchua
Enter password:
Re-enter password:
2
3
4
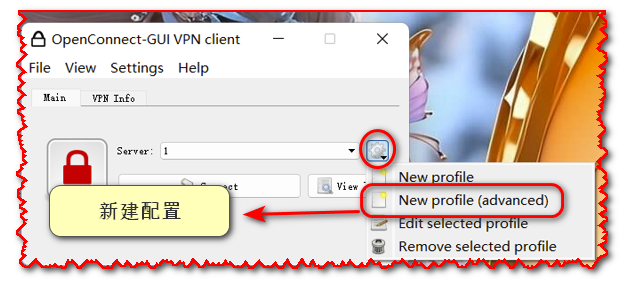
# 4.2 客户端配置
- 新建配置
- 参数配置
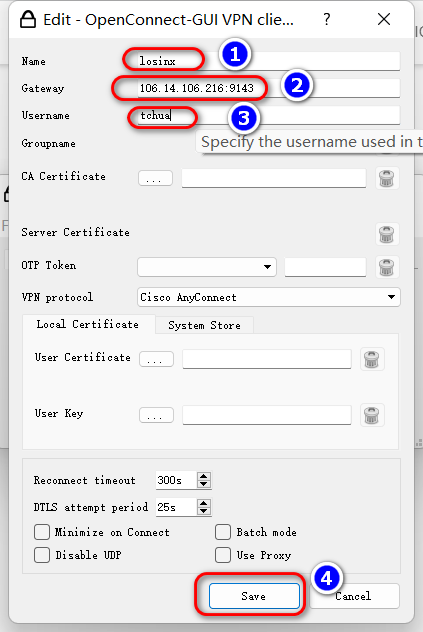
参数说明
- ① vpn的名字,可以自定义
- ② vpn地址,IP+端口(注意需要防火墙放行该端口)
- ③ vpn账号
- ④ 保存配置
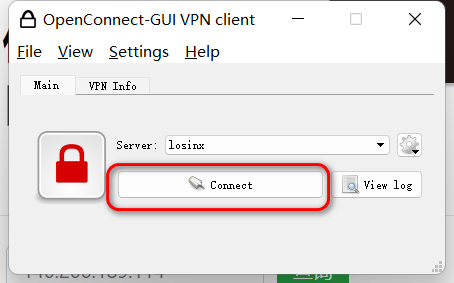
- 连接
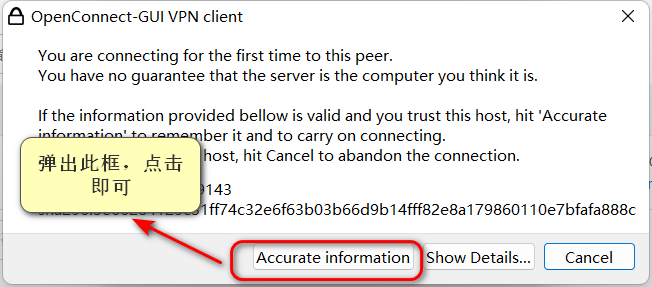
参数配置保存后,点击
Connect
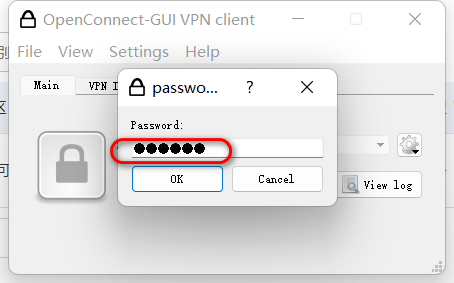
- 密码
输入vpn账号密码,点击🆗
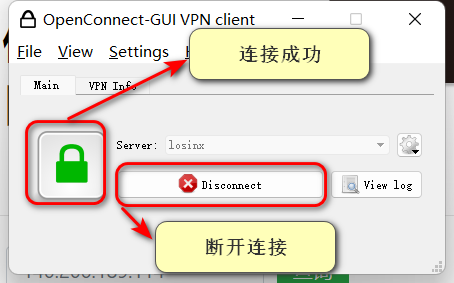
- 连接状态
# 五、Docker部署
通过上面步骤可以看到,虽然安装很简单,但是配置还是比较繁琐的,因此我们可以使用别人集成好的镜像,如果想自己构建,则直接参考Docker部署ocserv (opens new window)中的Dockerfile自行构建即可。
# 5.1 获取镜像
[root@iZuf6bw31ptihyf55wlkmpZ ~]# docker pull wppurking/ocserv
# 5.2 调整配置
我们虽然使用Docker部署,但是为了方便,这里把
ocserv.conf配置文件和ocpasswd用户密码文件映射出来
这里对于配置文件其实没有什么可调整,注意以下几点:
- Docker认证模式也是基于文件的,映射时需要注意文职
- 证书文件下面配置文件也是定义好的,无需改动,镜像中也是生成好的,不用我们再去生成
- 如果想要自定义,可以直接使用
Dockerfile构建镜像,这样证书就是唯一的了。
完整配置
# User authentication method. Could be set multiple times and in
# that case all should succeed. To enable multiple methods use
# multiple auth directives. Available options: certificate,
# plain, pam, radius, gssapi.
#
# Note that authentication methods cannot be changed with reload.

# certificate:
#  This indicates that all connecting users must present a certificate.
#
# pam[gid-min=1000]:
#  This enabled PAM authentication of the user. The gid-min option is used
# by auto-select-group option, in order to select the minimum valid group ID.
#
# plain[passwd=/etc/ocserv/ocpasswd,otp=/etc/ocserv/users.otp]
#  The plain option requires specifying a password file which contains
# entries of the following format.
# "username:groupname1,groupname2:encoded-password"
# One entry must be listed per line, and 'ocpasswd' should be used
# to generate password entries. The 'otp' suboption allows to specify
# an oath password file to be used for one time passwords; the format of
# the file is described in https://code.google.com/p/mod-authn-otp/wiki/UsersFile
#
# radius[config=/etc/radiusclient/radiusclient.conf,groupconfig=true,nas-identifier=name,override-interim-updates=false]:
#  The radius option requires specifying freeradius-client configuration
# file. If the groupconfig option is set, then config-per-user will be overriden,
# and all configuration will be read from radius. The 'override-interim-updates' if set to
# true will ignore Acct-Interim-Interval from the server and 'stats-report-time' will be considered.
#
# gssapi[keytab=/etc/key.tab,require-local-user-map=true,tgt-freshness-time=900]
#  The gssapi option allows to use authentication methods supported by GSSAPI,
# such as Kerberos tickets with ocserv. It should be best used as an alternative
# to PAM (i.e., have pam in auth and gssapi in enable-auth), to allow users with
# tickets and without tickets to login. The default value for require-local-user-map
# is true. The 'tgt-freshness-time' if set, it would require the TGT tickets presented
# to have been issued within the provided number of seconds. That option is used to
# restrict logins even if the KDC provides long time TGT tickets.

#auth = "pam"
#auth = "pam[gid-min=1000]"
#auth = "plain[passwd=./sample.passwd,otp=./sample.otp]"
# ---------- 设置加载密码文件 -----------
auth = "plain[passwd=/etc/ocserv/ocpasswd]"
#auth = "certificate"
#auth = "radius[config=/etc/radiusclient/radiusclient.conf,groupconfig=true]"

# Specify alternative authentication methods that are sufficient
# for authentication. That is, if set, any of the methods enabled
# will be sufficient to login.
enable-auth = "certificate"
#enable-auth = "gssapi"
#enable-auth = "gssapi[keytab=/etc/key.tab,require-local-user-map=true,tgt-freshness-time=900]"

# Accounting methods available:
# radius: can be combined with any authentication method, it provides
#      radius accounting to available users (see also stats-report-time).
#
# pam: can be combined with any authentication method, it provides
#      a validation of the connecting user's name using PAM. It is
#      superfluous to use this method when authentication is already
#      PAM.
#
# Only one accounting method can be specified.
#acct = "radius[config=/etc/radiusclient/radiusclient.conf]"

# Use listen-host to limit to specific IPs or to the IPs of a provided
# hostname.
#listen-host = [IP|HOSTNAME]

# When the server has a dynamic DNS address (that may change),
# should set that to true to ask the client to resolve again on
# reconnects.
#listen-host-is-dyndns = true

# TCP and UDP port number
tcp-port = 443
#udp-port = 443

# Accept connections using a socket file. It accepts HTTP
# connections (i.e., without SSL/TLS unlike its TCP counterpart),
# and uses it as the primary channel. That option cannot be
# combined with certificate authentication.
#listen-clear-file = /var/run/ocserv-conn.socket

# The user the worker processes will be run as. It should be
# unique (no other services run as this user).
run-as-user = nobody
run-as-group = daemon

# socket file used for IPC with occtl. You only need to set that,
# if you use more than a single servers.
#occtl-socket-file = /var/run/occtl.socket

# socket file used for server IPC (worker-main), will be appended with .PID
# It must be accessible within the chroot environment (if any), so it is best
# specified relatively to the chroot directory.
socket-file = /var/run/ocserv-socket

# The default server directory. Does not require any devices present.
#chroot-dir = /path/to/chroot

# The key and the certificates of the server
# The key may be a file, or any URL supported by GnuTLS (e.g.,
# tpmkey:uuid=xxxxxxx-xxxx-xxxx-xxxx-xxxxxxxx;storage=user
# or pkcs11:object=my-vpn-key;object-type=private)
#
# The server-cert file may contain a single certificate, or
# a sorted certificate chain.
#
# There may be multiple server-cert and server-key directives,
# but each key should correspond to the preceding certificate.
# -------- Dockerfile 中生成的 cert -------
server-cert = /opt/certs/server-cert.pem
server-key = /opt/certs/server-key.pem

# Diffie-Hellman parameters. Only needed if you require support
# for the DHE ciphersuites (by default this server supports ECDHE).
# Can be generated using:
# certtool --generate-dh-params --outfile /path/to/dh.pem
#dh-params = /path/to/dh.pem

# In case PKCS #11, TPM or encrypted keys are used the PINs should be available
# in files. The srk-pin-file is applicable to TPM keys only, and is the
# storage root key.
#pin-file = /path/to/pin.txt
#srk-pin-file = /path/to/srkpin.txt

# The password or PIN needed to unlock the key in server-key file.
# Only needed if the file is encrypted or a PKCS #11 object. This
# is an alternative method to pin-file.
#key-pin = 1234

# The SRK PIN for TPM.
# This is an alternative method to srk-pin-file.
#srk-pin = 1234

# The Certificate Authority that will be used to verify
# client certificates (public keys) if certificate authentication
# is set.
# -------------- 需要证书登陆的需要 -------------
ca-cert = /opt/certs/ca-cert.pem
#ca-cert = /etc/ssl/certs/ca.pem


### All configuration options below this line are reloaded on a SIGHUP.
### The options above, will remain unchanged.

# Whether to enable seccomp/Linux namespaces worker isolation. That restricts the number of
# system calls allowed to a worker process, in order to reduce damage from a
# bug in the worker process. It is available on Linux systems at a performance cost.
# The performance cost is roughly 2% overhead at transfer time (tested on a Linux 3.17.8).
isolate-workers = true

# A banner to be displayed on clients
#banner = "Welcome"

# Limit the number of clients. Unset or set to zero for unlimited.
#max-clients = 1024
max-clients = 0

# Limit the number of identical clients (i.e., users connecting
# multiple times). Unset or set to zero for unlimited.
max-same-clients = 0

# When the server has a dynamic DNS address (that may change),
# should set that to true to ask the client to resolve again on
# reconnects.
#listen-host-is-dyndns = true

# When the server receives connections from a proxy, like haproxy
# which supports the proxy protocol, set this to obtain the correct
# client addresses. The proxy protocol (v2) would then be expected in
# the TCP or UNIX socket (not the UDP one).
#listen-proxy-proto = true

# Limit the number of client connections to one every X milliseconds
# (X is the provided value). Set to zero for no limit.
rate-limit-ms = 0

# Stats report time. The number of seconds after which each
# worker process will report its usage statistics (number of
# bytes transferred etc). This is useful when accounting like
# radius is in use.
#stats-report-time = 360

# Keepalive in seconds
keepalive = 32400

# Dead peer detection in seconds.
# Note that when the client is behind a NAT this value
# needs to be short enough to prevent the NAT disassociating
# his UDP session from the port number. Otherwise the client
# could have his UDP connection stalled, for several minutes.
dpd = 90

# Dead peer detection for mobile clients. That needs to
# be higher to prevent such clients being awaken too
# often by the DPD messages, and save battery.
# The mobile clients are distinguished from the header
# 'X-AnyConnect-Identifier-DeviceType'.
mobile-dpd = 1800

# MTU discovery (DPD must be enabled)
try-mtu-discovery = true

# If you have a certificate from a CA that provides an OCSP
# service you may provide a fresh OCSP status response within
# the TLS handshake. That will prevent the client from connecting
# independently on the OCSP server.
# You can update this response periodically using:
# ocsptool --ask --load-cert=your_cert --load-issuer=your_ca --outfile response
# Make sure that you replace the following file in an atomic way.
#ocsp-response = /path/to/ocsp.der

# The object identifier that will be used to read the user ID in the client
# certificate. The object identifier should be part of the certificate's DN
# https://technet.microsoft.com/en-us/library/cc772812(WS.10).aspx
# Useful OIDs are:
#  CN = 2.5.4.3, UID = 0.9.2342.19200300.100.1.1
cert-user-oid = 0.9.2342.19200300.100.1.1

# The object identifier that will be used to read the user group in the
# client  certificate. The object identifier should be part of the certificate's
# DN. Useful OIDs are:
#  OU (organizational unit) = 2.5.4.11
#cert-group-oid = 2.5.4.11

# The revocation list of the certificates issued by the 'ca-cert' above.
# See the manual to generate an empty CRL initially. The CRL will be reloaded
# periodically when ocserv detects a change in the file. To force a reload use
# SIGHUP.
#crl = /path/to/crl.pem

# Uncomment this to enable compression negotiation (LZS, LZ4).
# ----- 打开 lz4  -----
compression = true

# Set the minimum size under which a packet will not be compressed.
# That is to allow low-latency for VoIP packets. The default size
# is 256 bytes. Modify it if the clients typically use compression
# as well of VoIP with codecs that exceed the default value.
# ------ 少于 256 bytes 不压缩 -----
no-compress-limit = 256

# GnuTLS priority string; note that SSL 3.0 is disabled by default
# as there are no openconnect (and possibly anyconnect clients) using
# that protocol. The string below does not enforce perfect forward
# secrecy, in order to be compatible with legacy clients.
#
# Note that the most performant ciphersuites are the moment are the ones
# involving AES-GCM. These are very fast in x86 and x86-64 hardware, and
# in addition require no padding, thus taking full advantage of the MTU.
# For that to be taken advantage of, the openconnect client must be
# used, and the server must be compiled against GnuTLS 3.2.7 or later.
# Use "gnutls-cli --benchmark-tls-ciphers", to see the performance
# difference with AES_128_CBC_SHA1 (the default for anyconnect clients)
# in your system.

tls-priorities = "PERFORMANCE:%SERVER_PRECEDENCE:%COMPAT:-VERS-SSL3.0"

# More combinations in priority strings are available, check
# http://gnutls.org/manual/html_node/Priority-Strings.html
# E.g., the string below enforces perfect forward secrecy (PFS)
# on the main channel.
#tls-priorities = "NORMAL:%SERVER_PRECEDENCE:%COMPAT:-RSA:-VERS-SSL3.0:-ARCFOUR-128"

# The time (in seconds) that a client is allowed to stay connected prior
# to authentication
auth-timeout = 40

# The time (in seconds) that a client is allowed to stay idle (no traffic)
# before being disconnected. Unset to disable.
idle-timeout = 86400

# The time (in seconds) that a mobile client is allowed to stay idle (no
# traffic) before being disconnected. Unset to disable.
mobile-idle-timeout = 86400

# The time (in seconds) that a client is not allowed to reconnect after
# a failed authentication attempt.
min-reauth-time = 300

# Banning clients in ocserv works with a point system. IP addresses
# that get a score over that configured number are banned for
# min-reauth-time seconds. By default a wrong password attempt is 10 points,
# a KKDCP POST is 1 point, and a connection is 1 point. Note that
# due to difference processes being involved the count of points
# will not be real-time precise.
#
# Score banning cannot be reliably used when receiving proxied connections
# locally from an HTTP server (i.e., when listen-clear-file is used).
#
# Set to zero to disable.
max-ban-score = 50

# The time (in seconds) that all score kept for a client is reset.
ban-reset-time = 300

# In case you'd like to change the default points.
#ban-points-wrong-password = 10
#ban-points-connection = 1
#ban-points-kkdcp = 1

# Cookie timeout (in seconds)
# Once a client is authenticated he's provided a cookie with
# which he can reconnect. That cookie will be invalided if not
# used within this timeout value. On a user disconnection, that
# cookie will also be active for this time amount prior to be
# invalid. That should allow a reasonable amount of time for roaming
# between different networks.
# ----- 拉长 -----
cookie-timeout = 86400000

# If this is enabled (not recommended) the cookies will stay
# valid even after a user manually disconnects, and until they
# expire. This may improve roaming with some broken clients.
#persistent-cookies = true

# Whether roaming is allowed, i.e., if true a cookie is
# restricted to a single IP address and cannot be re-used
# from a different IP.
deny-roaming = false

# ReKey time (in seconds)
# ocserv will ask the client to refresh keys periodically once
# this amount of seconds is elapsed. Set to zero to disable (note
# that, some clients fail if rekey is disabled).
# ----- 拉长 -----
rekey-time = 86400000

# ReKey method
# Valid options: ssl, new-tunnel
#  ssl: Will perform an efficient rehandshake on the channel allowing
#       a seamless connection during rekey.
#  new-tunnel: Will instruct the client to discard and re-establish the channel.
#       Use this option only if the connecting clients have issues with the ssl
#       option.
rekey-method = ssl

# Script to call when a client connects and obtains an IP.
# The following parameters are passed on the environment.
# REASON, USERNAME, GROUPNAME, DEVICE, IP_REAL (the real IP of the client),
# IP_REAL_LOCAL (the local interface IP the client connected), IP_LOCAL
# (the local IP in the P-t-P connection), IP_REMOTE (the VPN IP of the client),
# IPV6_LOCAL (the IPv6 local address if there are both IPv4 and IPv6
# assigned), IPV6_REMOTE (the IPv6 remote address), IPV6_PREFIX, and
# ID (a unique numeric ID); REASON may be "connect" or "disconnect".
# In addition the following variables OCSERV_ROUTES (the applied routes for this
# client), OCSERV_NO_ROUTES, OCSERV_DNS (the DNS servers for this client),
# will contain a space separated list of routes or DNS servers. A version
# of these variables with the 4 or 6 suffix will contain only the IPv4 or
# IPv6 values.

# The disconnect script will receive the additional values: STATS_BYTES_IN,
# STATS_BYTES_OUT, STATS_DURATION that contain a 64-bit counter of the bytes
# output from the tun device, and the duration of the session in seconds.

#connect-script = /usr/bin/myscript
#disconnect-script = /usr/bin/myscript

# UTMP
# Register the connected clients to utmp. This will allow viewing
# the connected clients using the command 'who'.
#use-utmp = true

# Whether to enable support for the occtl tool (i.e., either through D-BUS,
# or via a unix socket).
use-occtl = true

# PID file. It can be overriden in the command line.
pid-file = /var/run/ocserv.pid

# Set the protocol-defined priority (SO_PRIORITY) for packets to
# be sent. That is a number from 0 to 6 with 0 being the lowest
# priority. Alternatively this can be used to set the IP Type-
# Of-Service, by setting it to a hexadecimal number (e.g., 0x20).
# This can be set per user/group or globally.
net-priority = 6

# Set the VPN worker process into a specific cgroup. This is Linux
# specific and can be set per user/group or globally.
#cgroup = "cpuset,cpu:test"

#
# Network settings
#

# The name to use for the tun device
device = vpns

# Whether the generated IPs will be predictable, i.e., IP stays the
# same for the same user when possible.
predictable-ips = true

# The default domain to be advertised
# -------- 不需要这个 -----------
#default-domain = example.com


# The pool of addresses that leases will be given from. If the leases
# are given via Radius, or via the explicit-ip? per-user config option then
# these network values should contain a network with at least a single
# address that will remain under the full control of ocserv (that is
# to be able to assign the local part of the tun device address).
# Note that, you could use addresses from a subnet of your LAN network if you
# enable proxy arp in the LAN interface (see http://infradead.org/ocserv/recipes-ocserv-pseudo-bridge.html);
# in that case it is recommended to set ping-leases to true.
ipv4-network = 10.100.0.1
ipv4-netmask = 255.255.255.0

# An alternative way of specifying the network:
#ipv4-network = 192.168.1.0/24

# The IPv6 subnet that leases will be given from.
#ipv6-network = fda9:4efe:7e3b:03ea::/64

# Specify the size of the network to provide to clients. It is
# generally recommended to provide clients with a /64 network in
# IPv6, but any subnet may be specified. To provide clients only
# with a single IP use the prefix 128.
#ipv6-subnet-prefix = 128
#ipv6-subnet-prefix = 64

# Whether to tunnel all DNS queries via the VPN. This is the default
# when a default route is set.
#tunnel-all-dns = true

# The advertized DNS server. Use multiple lines for
# multiple servers.
# dns = fc00::4be0
#dns = 8.8.8.8
#dns = 8.8.4.4
dns = 10.0.0.1

# The NBNS server (if any)
#nbns = 192.168.1.3

# The domains over which the provided DNS should be used. Use
# multiple lines for multiple domains.
#split-dns = example.com

# Prior to leasing any IP from the pool ping it to verify that
# it is not in use by another (unrelated to this server) host.
# Only set to true, if there can be occupied addresses in the
# IP range for leases.
ping-leases = false

# Use this option to enforce an MTU value to the incoming
# connections. Unset to use the default MTU of the TUN device.
#mtu = 1420
mtu = 1482

# Unset to enable bandwidth restrictions (in bytes/sec). The
# setting here is global, but can also be set per user or per group.
#rx-data-per-sec = 40000
#tx-data-per-sec = 40000

# The number of packets (of MTU size) that are available in
# the output buffer. The default is low to improve latency.
# Setting it higher will improve throughput.
#output-buffer = 10
output-buffer = 20

# Routes to be forwarded to the client. If you need the
# client to forward routes to the server, you may use the
# config-per-user/group or even connect and disconnect scripts.
#
# To set the server as the default gateway for the client just
# comment out all routes from the server, or use the special keyword
# 'default'.

#route = 10.10.10.0/255.255.255.0
#route = 192.168.0.0/255.255.0.0
#route = fef4:db8:1000:1001::/64

# Subsets of the routes above that will not be routed by
# the server.

# ------ route 与 no-route 只能选一个 ------
# 让 server 所在的服务器也不走路由(可 ssh).
no-route = 192.168.0.0/255.255.0.0
no-route = 1.0.0.0/255.192.0.0
no-route = 1.64.0.0/255.224.0.0
no-route = 1.112.0.0/255.248.0.0
no-route = 1.176.0.0/255.240.0.0
no-route = 1.192.0.0/255.240.0.0
no-route = 14.0.0.0/255.224.0.0
no-route = 14.96.0.0/255.224.0.0
no-route = 14.128.0.0/255.224.0.0
no-route = 14.192.0.0/255.224.0.0
no-route = 27.0.0.0/255.192.0.0
no-route = 27.96.0.0/255.224.0.0
no-route = 27.128.0.0/255.224.0.0
no-route = 27.176.0.0/255.240.0.0
no-route = 27.192.0.0/255.224.0.0
no-route = 27.224.0.0/255.252.0.0
no-route = 36.0.0.0/255.192.0.0
no-route = 36.96.0.0/255.224.0.0
no-route = 36.128.0.0/255.192.0.0
no-route = 36.192.0.0/255.224.0.0
no-route = 36.240.0.0/255.240.0.0
no-route = 39.0.0.0/255.255.0.0
no-route = 39.64.0.0/255.224.0.0
no-route = 39.96.0.0/255.240.0.0
no-route = 39.128.0.0/255.192.0.0
no-route = 40.72.0.0/255.254.0.0
no-route = 40.124.0.0/255.252.0.0
no-route = 42.0.0.0/255.248.0.0
no-route = 42.48.0.0/255.240.0.0
no-route = 42.80.0.0/255.240.0.0
no-route = 42.96.0.0/255.224.0.0
no-route = 42.128.0.0/255.128.0.0
no-route = 43.224.0.0/255.224.0.0
no-route = 45.3.32.0/255.255.224.0
no-route = 45.65.16.0/255.255.240.0
no-route = 45.78.80.0/255.255.240.0
no-route = 45.112.0.0/255.240.0.0
no-route = 45.248.0.0/255.248.0.0
no-route = 47.92.0.0/255.252.0.0
no-route = 47.96.0.0/255.224.0.0
no-route = 49.0.0.0/255.128.0.0
no-route = 49.128.0.0/255.224.0.0
no-route = 49.192.0.0/255.192.0.0
no-route = 52.80.0.0/255.252.0.0
no-route = 54.222.0.0/255.254.0.0
no-route = 58.0.0.0/255.128.0.0
no-route = 58.128.0.0/255.224.0.0
no-route = 58.192.0.0/255.224.0.0
no-route = 58.240.0.0/255.240.0.0
no-route = 59.32.0.0/255.224.0.0
no-route = 59.64.0.0/255.224.0.0
no-route = 59.96.0.0/255.240.0.0
no-route = 59.144.0.0/255.240.0.0
no-route = 59.160.0.0/255.224.0.0
no-route = 59.192.0.0/255.192.0.0
no-route = 60.0.0.0/255.224.0.0
no-route = 60.48.0.0/255.240.0.0
no-route = 60.160.0.0/255.224.0.0
no-route = 60.192.0.0/255.192.0.0
no-route = 61.0.0.0/255.192.0.0
no-route = 61.80.0.0/255.248.0.0
no-route = 61.128.0.0/255.192.0.0
no-route = 61.224.0.0/255.224.0.0
no-route = 91.234.36.0/255.255.255.0
no-route = 101.0.0.0/255.128.0.0
no-route = 101.128.0.0/255.224.0.0
no-route = 101.192.0.0/255.240.0.0
no-route = 101.224.0.0/255.224.0.0
no-route = 103.0.0.0/255.0.0.0
no-route = 104.167.16.0/255.255.240.0
no-route = 104.207.32.0/255.255.224.0
no-route = 106.0.0.0/255.128.0.0
no-route = 106.224.0.0/255.240.0.0
no-route = 110.0.0.0/255.128.0.0
no-route = 110.144.0.0/255.240.0.0
no-route = 110.160.0.0/255.224.0.0
no-route = 110.192.0.0/255.192.0.0
no-route = 111.0.0.0/255.192.0.0
no-route = 111.64.0.0/255.224.0.0
no-route = 111.112.0.0/255.240.0.0
no-route = 111.128.0.0/255.192.0.0
no-route = 111.192.0.0/255.224.0.0
no-route = 111.224.0.0/255.240.0.0
no-route = 112.0.0.0/255.128.0.0
no-route = 112.128.0.0/255.240.0.0
no-route = 112.192.0.0/255.252.0.0
no-route = 112.224.0.0/255.224.0.0
no-route = 113.0.0.0/255.128.0.0
no-route = 113.128.0.0/255.240.0.0
no-route = 113.192.0.0/255.192.0.0
no-route = 114.16.0.0/255.240.0.0
no-route = 114.48.0.0/255.240.0.0
no-route = 114.64.0.0/255.192.0.0
no-route = 114.128.0.0/255.240.0.0
no-route = 114.192.0.0/255.192.0.0
no-route = 115.0.0.0/255.0.0.0
no-route = 116.0.0.0/255.0.0.0
no-route = 117.0.0.0/255.128.0.0
no-route = 117.128.0.0/255.192.0.0
no-route = 118.16.0.0/255.240.0.0
no-route = 118.64.0.0/255.192.0.0
no-route = 118.128.0.0/255.128.0.0
no-route = 119.0.0.0/255.128.0.0
no-route = 119.128.0.0/255.192.0.0
no-route = 119.224.0.0/255.224.0.0
no-route = 120.0.0.0/255.192.0.0
no-route = 120.64.0.0/255.224.0.0
no-route = 120.128.0.0/255.240.0.0
no-route = 120.192.0.0/255.192.0.0
no-route = 121.0.0.0/255.128.0.0
no-route = 121.192.0.0/255.192.0.0
no-route = 122.0.0.0/254.0.0.0
no-route = 124.0.0.0/255.0.0.0
no-route = 125.0.0.0/255.128.0.0
no-route = 125.160.0.0/255.224.0.0
no-route = 125.192.0.0/255.192.0.0
no-route = 137.59.59.0/255.255.255.0
no-route = 137.59.88.0/255.255.252.0
no-route = 139.0.0.0/255.224.0.0
no-route = 139.128.0.0/255.128.0.0
no-route = 140.64.0.0/255.240.0.0
no-route = 140.128.0.0/255.240.0.0
no-route = 140.192.0.0/255.192.0.0
no-route = 144.0.0.0/255.248.0.0
no-route = 144.12.0.0/255.255.0.0
no-route = 144.48.0.0/255.248.0.0
no-route = 144.123.0.0/255.255.0.0
no-route = 144.255.0.0/255.255.0.0
no-route = 146.196.0.0/255.255.128.0
no-route = 150.0.0.0/255.255.0.0
no-route = 150.96.0.0/255.224.0.0
no-route = 150.128.0.0/255.240.0.0
no-route = 150.192.0.0/255.192.0.0
no-route = 152.104.128.0/255.255.128.0
no-route = 153.0.0.0/255.192.0.0
no-route = 153.96.0.0/255.224.0.0
no-route = 157.0.0.0/255.255.0.0
no-route = 157.18.0.0/255.255.0.0
no-route = 157.61.0.0/255.255.0.0
no-route = 157.112.0.0/255.240.0.0
no-route = 157.144.0.0/255.240.0.0
no-route = 157.255.0.0/255.255.0.0
no-route = 159.226.0.0/255.255.0.0
no-route = 160.19.208.0/255.255.240.0
no-route = 160.20.48.0/255.255.252.0
no-route = 160.202.0.0/255.255.0.0
no-route = 160.238.64.0/255.255.252.0
no-route = 161.207.0.0/255.255.0.0
no-route = 162.105.0.0/255.255.0.0
no-route = 163.0.0.0/255.192.0.0
no-route = 163.96.0.0/255.224.0.0
no-route = 163.128.0.0/255.192.0.0
no-route = 163.192.0.0/255.224.0.0
no-route = 166.111.0.0/255.255.0.0
no-route = 167.139.0.0/255.255.0.0
no-route = 167.189.0.0/255.255.0.0
no-route = 167.220.244.0/255.255.252.0
no-route = 168.160.0.0/255.255.0.0
no-route = 170.179.0.0/255.255.0.0
no-route = 171.0.0.0/255.128.0.0
no-route = 171.192.0.0/255.224.0.0
no-route = 175.0.0.0/255.128.0.0
no-route = 175.128.0.0/255.192.0.0
no-route = 180.64.0.0/255.192.0.0
no-route = 180.128.0.0/255.128.0.0
no-route = 182.0.0.0/255.0.0.0
no-route = 183.0.0.0/255.192.0.0
no-route = 183.64.0.0/255.224.0.0
no-route = 183.128.0.0/255.128.0.0
no-route = 192.124.154.0/255.255.255.0
no-route = 192.140.128.0/255.255.128.0
no-route = 202.0.0.0/255.128.0.0
no-route = 202.128.0.0/255.192.0.0
no-route = 202.192.0.0/255.224.0.0
no-route = 203.0.0.0/255.0.0.0
no-route = 210.0.0.0/255.192.0.0
no-route = 210.64.0.0/255.224.0.0
no-route = 210.160.0.0/255.224.0.0
no-route = 210.192.0.0/255.224.0.0
no-route = 211.64.0.0/255.248.0.0
no-route = 211.80.0.0/255.240.0.0
no-route = 211.96.0.0/255.248.0.0
no-route = 211.136.0.0/255.248.0.0
no-route = 211.144.0.0/255.240.0.0
no-route = 211.160.0.0/255.248.0.0
no-route = 218.0.0.0/255.128.0.0
no-route = 218.160.0.0/255.224.0.0
no-route = 218.192.0.0/255.192.0.0
no-route = 219.64.0.0/255.224.0.0
no-route = 219.128.0.0/255.224.0.0
no-route = 219.192.0.0/255.192.0.0
no-route = 220.96.0.0/255.224.0.0
no-route = 220.128.0.0/255.128.0.0
no-route = 221.0.0.0/255.224.0.0
no-route = 221.96.0.0/255.224.0.0
no-route = 221.128.0.0/255.128.0.0
no-route = 222.0.0.0/255.0.0.0
no-route = 223.0.0.0/255.224.0.0
no-route = 223.64.0.0/255.192.0.0
no-route = 223.128.0.0/255.128.0.0


# Note the that following two firewalling options currently are available
# in Linux systems with iptables software.

# If set, the script /usr/bin/ocserv-fw will be called to restrict
# the user to its allowed routes and prevent him from accessing
# any other routes. In case of defaultroute, the no-routes are restricted.
# All the routes applied by ocserv can be reverted using /usr/bin/ocserv-fw
# --removeall. This option can be set globally or in the per-user configuration.
#restrict-user-to-routes = true

# This option implies restrict-user-to-routes set to true. If set, the
# script /usr/bin/ocserv-fw will be called to restrict the user to
# access specific ports in the network. This option can be set globally
# or in the per-user configuration.
#restrict-user-to-ports = "tcp(443), tcp(80), udp(443), sctp(99), tcp(583), icmp(), icmpv6()"

# You could also use negation, i.e., block the user from accessing these ports only.
#restrict-user-to-ports = "!(tcp(443), tcp(80))"

# When set to true, all client's iroutes are made visible to all
# connecting clients except for the ones offering them. This option
# only makes sense if config-per-user is set.
#expose-iroutes = true

# Groups that a client is allowed to select from.
# A client may belong in multiple groups, and in certain use-cases
# it is needed to switch between them. For these cases the client can
# select prior to authentication. Add multiple entries for multiple groups.
# The group may be followed by a user-friendly name in brackets.
#select-group = group1
#select-group = group2[My special group]

# The name of the (virtual) group that if selected it would assign the user
# to its default group.
#default-select-group = DEFAULT

# Instead of specifying manually all the allowed groups, you may instruct
# ocserv to scan all available groups and include the full list.
#auto-select-group = true

# Configuration files that will be applied per user connection or
# per group. Each file name on these directories must match the username
# or the groupname.
# The options allowed in the configuration files are dns, nbns,
#  ipv?-network, ipv4-netmask, rx/tx-per-sec, iroute, route, no-route,
#  explicit-ipv4, explicit-ipv6, net-priority, deny-roaming, no-udp,
#  keepalive, dpd, mobile-dpd, max-same-clients, tunnel-all-dns,
#  restrict-user-to-routes, user-profile, cgroup, stats-report-time,
#  mtu, idle-timeout, mobile-idle-timeout, restrict-user-to-ports,
#  and session-timeout.
#
# Note that the 'iroute' option allows to add routes on the server
# based on a user or group. The syntax depends on the input accepted
# by the commands route-add-cmd and route-del-cmd (see below). The no-udp
# is a boolean option (e.g., no-udp = true), and will prevent a UDP session
# for that specific user or group. The hostname option will set a
# hostname to override any proposed by the user. Note also, that, any
# routes, no-routes, DNS or NBNS servers present will overwrite the global ones.

#config-per-user = /etc/ocserv/config-per-user/
#config-per-group = /etc/ocserv/config-per-group/

# When config-per-xxx is specified and there is no group or user that
# matches, then utilize the following configuration.
#default-user-config = /etc/ocserv/defaults/user.conf
#default-group-config = /etc/ocserv/defaults/group.conf

# The system command to use to setup a route. %{R} will be replaced with the
# route/mask, %{RI} with the route in CIDR format, and %{D} with the (tun) device.
#
# The following example is from linux systems. %{R} should be something
# like 192.168.2.0/255.255.255.0 and %{RI} 192.168.2.0/24 (the argument of iroute).

#route-add-cmd = "ip route add %{R} dev %{D}"
#route-del-cmd = "ip route delete %{R} dev %{D}"

# This option allows to forward a proxy. The special keywords '%{U}'
# and '%{G}', if present will be replaced by the username and group name.
#proxy-url = http://example.com/
#proxy-url = http://example.com/%{U}/

# This option allows you to specify a URL location where a client can
# post using MS-KKDCP, and the message will be forwarded to the provided
# KDC server. That is a translation URL between HTTP and Kerberos.
# In MIT kerberos you'll need to add in realms:
#   EXAMPLE.COM = {
#     kdc = https://ocserv.example.com/KdcProxy
#     http_anchors = FILE:/etc/ocserv-ca.pem
#   }
# This option is available if ocserv is compiled with GSSAPI support.

#kkdcp = "SERVER-PATH KERBEROS-REALM PROTOCOL@SERVER:PORT"
#kkdcp = "/KdcProxy KERBEROS.REALM udp@127.0.0.1:88"
#kkdcp = "/KdcProxy KERBEROS.REALM tcp@127.0.0.1:88"
#kkdcp = "/KdcProxy KERBEROS.REALM tcp@[::1]:88"

#
# The following options are for (experimental) AnyConnect client
# compatibility.

# This option must be set to true to support legacy CISCO clients.
# A side effect of this option is that it will no longer be required
# for clients to present their certificate on every connection.
# That is they may resume a cookie without presenting a certificate
# (when certificate authentication is used).
cisco-client-compat = true

# Client profile xml. A sample file exists in doc/profile.xml.
# It is required by some of the CISCO clients.
# This file must be accessible from inside the worker's chroot.
# Note that enabling this option is not recommended as it will allow
# the worker processes to open arbitrary files (when isolate-workers is
# set to true).
#user-profile = /path/to/file.xml

#Advanced options

# Option to allow sending arbitrary custom headers to the client after
# authentication and prior to VPN tunnel establishment. You shouldn't
# need to use this option normally; if you do and you think that
# this may help others, please send your settings and reason to
# the openconnect mailing list. The special keywords '%{U}'
# and '%{G}', if present will be replaced by the username and group name.
#custom-header = "X-My-Header: hi there"
2
3
4
5
6
7
8
9
10
11
12
13
14
15
16
17
18
19
20
21
22
23
24
25
26
27
28
29
30
31
32
33
34
35
36
37
38
39
40
41
42
43
44
45
46
47
48
49
50
51
52
53
54
55
56
57
58
59
60
61
62
63
64
65
66
67
68
69
70
71
72
73
74
75
76
77
78
79
80
81
82
83
84
85
86
87
88
89
90
91
92
93
94
95
96
97
98
99
100
101
102
103
104
105
106
107
108
109
110
111
112
113
114
115
116
117
118
119
120
121
122
123
124
125
126
127
128
129
130
131
132
133
134
135
136
137
138
139
140
141
142
143
144
145
146
147
148
149
150
151
152
153
154
155
156
157
158
159
160
161
162
163
164
165
166
167
168
169
170
171
172
173
174
175
176
177
178
179
180
181
182
183
184
185
186
187
188
189
190
191
192
193
194
195
196
197
198
199
200
201
202
203
204
205
206
207
208
209
210
211
212
213
214
215
216
217
218
219
220
221
222
223
224
225
226
227
228
229
230
231
232
233
234
235
236
237
238
239
240
241
242
243
244
245
246
247
248
249
250
251
252
253
254
255
256
257
258
259
260
261
262
263
264
265
266
267
268
269
270
271
272
273
274
275
276
277
278
279
280
281
282
283
284
285
286
287
288
289
290
291
292
293
294
295
296
297
298
299
300
301
302
303
304
305
306
307
308
309
310
311
312
313
314
315
316
317
318
319
320
321
322
323
324
325
326
327
328
329
330
331
332
333
334
335
336
337
338
339
340
341
342
343
344
345
346
347
348
349
350
351
352
353
354
355
356
357
358
359
360
361
362
363
364
365
366
367
368
369
370
371
372
373
374
375
376
377
378
379
380
381
382
383
384
385
386
387
388
389
390
391
392
393
394
395
396
397
398
399
400
401
402
403
404
405
406
407
408
409
410
411
412
413
414
415
416
417
418
419
420
421
422
423
424
425
426
427
428
429
430
431
432
433
434
435
436
437
438
439
440
441
442
443
444
445
446
447
448
449
450
451
452
453
454
455
456
457
458
459
460
461
462
463
464
465
466
467
468
469
470
471
472
473
474
475
476
477
478
479
480
481
482
483
484
485
486
487
488
489
490
491
492
493
494
495
496
497
498
499
500
501
502
503
504
505
506
507
508
509
510
511
512
513
514
515
516
517
518
519
520
521
522
523
524
525
526
527
528
529
530
531
532
533
534
535
536
537
538
539
540
541
542
543
544
545
546
547
548
549
550
551
552
553
554
555
556
557
558
559
560
561
562
563
564
565
566
567
568
569
570
571
572
573
574
575
576
577
578
579
580
581
582
583
584
585
586
587
588
589
590
591
592
593
594
595
596
597
598
599
600
601
602
603
604
605
606
607
608
609
610
611
612
613
614
615
616
617
618
619
620
621
622
623
624
625
626
627
628
629
630
631
632
633
634
635
636
637
638
639
640
641
642
643
644
645
646
647
648
649
650
651
652
653
654
655
656
657
658
659
660
661
662
663
664
665
666
667
668
669
670
671
672
673
674
675
676
677
678
679
680
681
682
683
684
685
686
687
688
689
690
691
692
693
694
695
696
697
698
699
700
701
702
703
704
705
706
707
708
709
710
711
712
713
714
715
716
717
718
719
720
721
722
723
724
725
726
727
728
729
730
731
732
733
734
735
736
737
738
739
740
741
742
743
744
745
746
747
748
749
750
751
752
753
754
755
756
757
758
759
760
761
762
763
764
765
766
767
768
769
770
771
772
773
774
775
776
777
778
779
780
781
782
783
784
785
786
787
788
789
790
791
792
793
794
795
796
797
798
799
800
801
802
803
804
805
806
# 5.3 启动
这里把配置文件还是放在宿主机
/etc/ocserv目录下,映射的端口9143:443,也可以修改配置文件端口为9143,其他没有什么变化,注意配置配置文件中所引用内容,位置对应即可。
docker run -d --privileged --name ocserv -v /etc/ocserv:/etc/ocserv -p 9143:443/tcp wppurking/ocserv
# 5.4 查看状态

# 5.5 总结
这样使用Docker部署就完成了,后面登录配置跟上面一样,按照相关参数配置即可,另外,因为使用的是Docker部署,因此,生成用户时,需要使用以下命令:
docker exec -it $(docker ps -a | grep vpn_run | awk '{print $1}') ocpasswd ${username}
关于Docker相关更多参考作者介绍点我 (opens new window)
# 六、occtl
occtl是ocserv的命令行工具包,可以支持很多操作,该命令也会随着ocserv一起安装,查看支持的命令,更多的使用参考官方介绍点我 (opens new window)。
[root@iZuf6bw31ptihyf55wlkmpZ ~]# occtl --help
occtl: [OPTIONS...] {COMMAND}

  -s --socket-file       Specify the server's occtl socket file
  -h --help              Show this help
     --debug             Enable more verbose information in some commands
  -v --version           Show the program's version
  -j --json              Use JSON formatting for output

Available Commands
 disconnect user [NAME]	Disconnect the specified user
 disconnect id [ID]	Disconnect the specified ID
     unban ip [IP]	Unban the specified IP
           reload	Reloads the server configuration
      show status	Prints the status and statistics of the server
       show users	Prints the connected users
     show ip bans	Prints the banned IP addresses
 show ip ban points	Prints all the known IP addresses which have points
     show iroutes	Prints the routes provided by users of the server
 show sessions all	Prints all the session IDs
 show sessions valid	Prints all the valid for reconnection sessions
 show session [SID]	Prints information on the specified session
    show user [NAME]	Prints information on the specified user
      show id [ID]	Prints information on the specified ID
      show events	Provides information about connecting users
         stop now	Terminates the server
2
3
4
5
6
7
8
9
10
11
12
13
14
15
16
17
18
19
20
21
22
23
24
25
26